کتاب آموزش جامع (مدلسازی، مونتاژ، ورقکاری، نقشه کشی، شبیه سازی) نرم افزار Autodesk Inventor، یک کتاب آموزشی جامع و کم نظیر از آموزش نرم افزار اینونتور می باشد. الگوی آموزشی این کتاب مبتنی بر آموزش با مثال می باشد. همانطور که در تصاویر زیر مشخص است، در این کتاب آموزشی، کاربر اینونتور با نحوه طراحی و مدلسازی، مونتاژ، ورقکاری، ایجاد نقشه اجرایی و شبیه سازی حرکت مطابق تصاویر زیر در محیط اینونتور Autodesk Inventor آشنا می شود. این کتاب مشتمل بر 165 صفحه، در 8 فصل، به زبان انگلیسی روان و به همراه تصاویر هر محیط و نوار ابزارها، به ترتیب زیر گردآوری شده است:
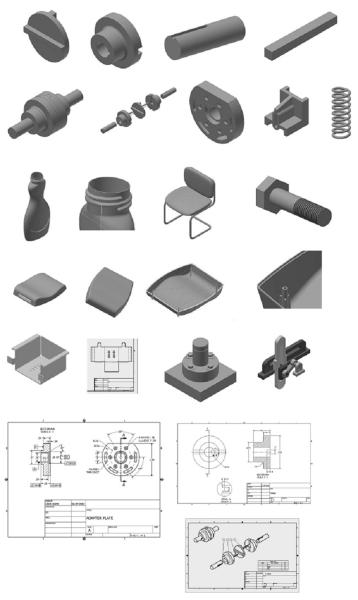
(تصویر بالا مجموعه تمریناتی است که به صورت گام به گام در این کتاب به کاربر در نرم افزار Autodesk Inventor آموزش داده می شود)
Autodesk Inventor 2016 Learn by doing
Table of Contents
Chapter 1: Getting Started with Inventor 2016
- Starting Autodesk Inventor
- User Interface
- Ribbon
- Application Menu
- Quick Access Toolbar
- Browser window
- Status bar
- Navigation Bar
- View Cube
- Shortcut Menus and Marking Menus
- Dialogs
- Customizing the Ribbon, Shortcut Keys, and Marking Menus
- Color Settings
Chapter 2: Part Modeling Basics
- TUTORIAL 1
- Creating a New Project
- Starting a New Part File
- Starting a Sketch
- Adding Dimensions
- Creating the Base Feature
- Adding an Extruded Feature
- Adding another Extruded Feature
- Saving the Part
- TUTORIAL 2
- Starting a New Part File
- Sketching a Revolve Profile
- Creating the Revolved Feature
- Creating the Cut feature
- Creating another Cut feature
- Adding a Fillet
- Saving the Part
- TUTORIAL 3
- Starting a New Part File
- Creating the Cylindrical Feature
- Creating Cut feature
- Saving the Part
- TUTORIAL 4
- Start Extruded feature
- Applying Draft
- Saving the Part
Chapter 3: Assembly Basics
- TUTORIAL 1
- Top-Down Approach
- Bottom-Up Approach
- Starting a New Assembly File
- Inserting the Base Component
- Adding the second component
- Applying Constraints
- Adding the Third Component
- Checking the Interference
- Saving the Assembly
- Starting the Main assembly
- Adding Disc to the Assembly
- Placing the Sub-assembly
- Adding Constraints
- Placing the second instance of the Sub-assembly
- Saving the Assembly
- TUTORIAL 2
- Starting a New Presentation File
- Creating the Exploded View
- Animating the Explosion
Chapter 4: Creating Drawings
- TUTORIAL 1
- Starting a New Drawing File
- Editing the Drawing Sheet
- Generating the Base View
- Generating the Section View
- Creating the Detailed View
- Creating Centermarks and Centerlines
- Retrieving Dimensions
- Adding additional dimensions
- Populating the Title Block
- Saving the Drawing
- TUTORIAL 2
- Creating New Sheet Format
- Creating a Custom Template
- Starting a Drawing using the Custom template
- Adding Dimensions
- TUTORIAL 3
- Creating a New Drawing File
- Generating Base View
- Generating the Exploded View
- Configuring the Parts list settings
- Creating the Parts list
- Creating Balloons
- Saving the Drawing
Chapter 5: Additional Modeling Tools
- TUTORIAL 1
- Creating the First Feature
- Adding the Second feature
- Creating a Counterbore Hole
- Creating a Threaded hole
- Creating a Circular Pattern
- Creating Chamfers
- TUTORIAL 2
- Creating the first feature
- Creating the Shell feature
- Creating the Third feature
- Creating a Cut Feature
- Creating the Rib Feature
- TUTORIAL 3
- Creating the Coil
- TUTORIAL 4
- Creating First Section and Rails
- Creating the second section
- Creating the Loft feature

جهت دانلود کتاب آموزش جامع (مدلسازی، مونتاژ، ورقکاری، نقشه کشی، شبیه سازی) نرم افزار Autodesk Inventor، بر لینک زیر کلیک نمایید:
آموزش اینونتور، کتاب آموزش جامع (مدلسازی، مونتاژ، ورقکاری، نقشه کشی، شبیه سازی) نرم افزار Autodesk Inventor


